Showing posts with label Say It With Letters. Show all posts

Monday, October 5, 2009

Take a Bow!

Here's our first Caardvarks challenge for October, sponsored by the amazing May Arts ribbon company. The 'Varks crew members were treated to some lovely ribbon samples for this challenge. Thanks, May Arts! ♥

Challenge: Create a *NEW* card using ribbon in a wonderful way!

Deadline: Entries must be linked via Mr. Linky by Oct. 17th at Midnight, PST

Prize: An incredible assortment of May Arts ribbon! (Here's a little peek.)


Here's my first card. I love, LOVED making this card! First of all, can you just STAND how cute that monsta is? I have been inspired to love all things monsta by my creatively-kooky and lovable 'Varks Crew pal, Lauren. I paired the image up with some Making Memories Spook Alley papers and of course the outrageous orange and black pom pom ribbon from May Arts. Isn't it the best for Halloween? If you may recall, I also used it on this set of altered letters.

More details about these letters can be seen by clicking here.


The other ribbon I was treated to is this beautiful crushed textured ribbon with wire. That chocolate brown color looks good enough to eat! I paired it with a simply-designed card of My Mind's Eye paper and rub on plus one simple journaling sheet. I love the cool aqua with the warm brown tones in this card.

For more May Arts ribbon inspiration, check out the RIBBON GALLERY of projects created by the Caardvarks Crew. You'll be glad you did!

Sunday, September 27, 2009

Say It With Letters - BOO!


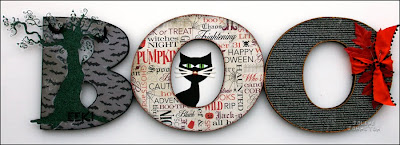
Here's my final project for the Say It With Letters blog. I received this chunky set of BOO letters and went to town!


All three letters feature paper from the Making Memories Spook Alley collection. The B also has a Fancy Pants glittered transparency tree, QuicKutz bats and Die Cuts With a View bling EEK.


I knew that I wanted to add a critter in the opening of one of the O's, so this black kitty cut on my QuicKutz Silhouette was perfect!


The final O has some May Arts ribbon, silk leaves and Halloween pins from Making Memories. I love adding all the finishing touches!

Be sure to check out the other Design Team versions of the boo letters in this SIWL blog post as well as ideas for other fall and Halloween shapes. Happy haunting!

Tuesday, August 25, 2009

Say It With Letters: Slow Down


Ok, how cute is this? When Deb from Say It With Letters sent me this unfinished snail to alter I wasn't quite sure which products to use. After digging through my stash I decided to go for something you could hang in a whimsical little boy's room. The papers are from My Mind's Eye, the button eyes from American Crafts, and the twine is Colorbok. The shell sparkles from clear glitter which is so tricky to photograph. Be sure to check out all the new DT projects at Say It With Letters as well as information about their current DT call. Good luck if you apply!

Sunday, June 14, 2009

Mermaid Tales


Here she is! May I humbly present Madame Melody Mermaid, the latest in my Say It With Letters altered creations. When I first got her in the mail, I had to admit that I was a little intimidated by her unique shape. I wanted so badly to alter her in a way that was true to my style yet keeping with the magical qualities that mermaids possess. After working around her on my scrap desk for two weeks...FAR AROUND HER...it hit me how to tackle this project. Here are a few of the techniques and materials that helped the magic happen.

To me, the key was in the mermaid scales. I already knew that I wanted to use a scalloped punch to create them, but I wasn't sure how to achieve the shimmer I wanted. I started digging through my stash and found papers that I had in my "donate" pile for my son's elementary school. I used silver hologram paper from WorldWin and silver glitter paper from The Paper Company and covered them with blue and green Ranger Alcohol Inks. (Thanks, Tim! ♥) Once the papers were dry it was just punch and layer until my arm fell off. Well, my arm didn't fall OFF, but it was a little sore from all that punching! The end result was pretty close to my original vision.


Miss Mermaid has achieved her bronzy tan thanks to Copper Glimmer Mist by Tattered Angels. I think this is the first altered project that I haven't base-coated with paint (it felt like cheating!)
Then I just played with details. The mirror was cut from silver paper; her top was tied with twine; her scales were trimmed with colored jute and a shell. But scrappers who know me best will be pleased to see just how much fiber I have managed to incorporate into this design. Layer upon layer of auburn fibers with highlights of gold were added, then enhanced with some tiny beads. A lovely ocean creature like this needs a few accessories, right? The whole mess is held together with Ranger Glossy Accents - and I mean a LOT!

If you'd love to tackle this fun project be sure to check out the mermaid shape in the Say It With Letters online store. My pal and fellow DT member Julie Ann has the same shape to play with. I can't wait to see her version soon!
ETA: Check out all the SIWL Design Team versions of the mermaid by clicking here!

Sunday, May 17, 2009

SIWL: Sweet Bracket Album

Today I'm sharing a fun mini album I made for Say It With Letters. Click here to view all the inside pages of my album.

This Heather Bailey Freshcuts Bracket Album kit is loaded with this popular bracket-shaped album and all the supplies you need to create a gorgeous project. Check out all the paper, ribbon, bling, flowers, buttons and glittery chipboard you get in this kit. After loading up my pages with plenty of embellishments I still had supplies left over to make a few cards.

If you're looking for kits like this or wooden shapes and letters to alter, Say It With Letters (Damboise Designs) is your place to shop! Their selection and customer service are top notch. Deb also loves sharing completed projects from her customers, so send in your photos once you are finished. Enjoy!

Thursday, April 2, 2009

Say It With Letters - GROW

Here's my new spring project for Say It With Letters online store. I ♥ altering letters and the challenge in finding fun things to add besides traditional scrapbooking supplies. Click on the image for a closer look!

Here are some details pics of each letter. I used Making Memories Paperie papers on all the letters. The rest of the goodies came from Michael's Arts and Crafts store. You can purchase the GROW letters by clicking here. There are so many letter styles and shapes available!


Stay tuned for more exciting crafting news from me in the next week. Happy scrapping!

Sunday, January 18, 2009

What a Hoot!

Click for a closer look.

Here is a fun wooden shape I altered several weeks ago from the fabulous Say It With Letters online store. The MDF shape comes smooth as butter, keyhole drilled in the back for easy hanging if that's your choice. I used crackle medium on my woodsy buddy as well as those awesome feathered patches as wings. Some layered flowers with brads for eyes and a handcut beak finished this project. Be sure to check out two other styles of owls by SIWL DT members Robyn Weatherspoon and Julie Masse. Julie also designed this shape for the store - how cool! You can purchase this awesome owl shape by clicking here. Enjoy!

Tuesday, November 11, 2008

NOEL - Say It WIth Letters

How exciting! Here is my first official project as a new Say It With Letters Design Team member. This new Fancy Noel set of letters was so fun to alter. I was inspired by the graceful curves of the N and the clean lines of the other letters.

For many of my altered letter projects, I paint all the letters the same base color regardless of what patterned papers I am going to use. For this set, I painted the letters to match the main color of each paper - two red, one ivory and one green. I love the end result! The papers are from the new Little Yellow Bicycle "Sharon Ann Christmas Magic Collection" which help accentuate the elegant feel of this graceful font style. A few simple embellishments finish this set of letters - they are ready for holiday decorating or gift giving!

Making Memories rub on, Strano ribbon, Michael's ribbon

Prima flowers and holly leaf, Making Memories glitter brad

Prima mulberry paper ornament, Ranger Stickles, Offray ribbon

Unknown resin wreath

Each letter is outlined with Holly Stickles which helps unify the classy look. Be sure to check out Damboise Designs online store for tons of new holiday letters, shapes and kits!

Monday, October 13, 2008

I'm in Great Shape!


Well, ok, maybe I'm not in *that* great of shape...but I am a proud new member of the Say It With Letters design team! ☺ I have been fortunate enough to work with letters and shapes from Deb Damboise several times this year, and now I'll be getting my monthly fix of her products. Special congrats to Julie Masse and Heather Simpson-Bluhm who are joining the team with me for this term. We have some very talented designers to keep up with! Stay tuned for my first project coming soon!

Thursday, September 25, 2008

eek!

More fun from Say It With Letters! When I earned my recent guest design spot with Deb, I took the opportunity to buy an extra set of her products to alter. Here's what I made!

The bat uses Doodlebug sugar coated cardstock, red bling and Platinum Stickles. Click on the image for a closer look at the pattern on the bat.

This e uses the Verbal Creep paper from Reminisce.

This white e uses spiderweb paper by Art Warehouse/Creative Imaginations.

The k features Halloween Whimsy Orange Swirl paper by K & Co. All three letters have Orange Peel Stickles around the edges and share one pack of Jolee's Boutique dimensional stickers.

Monday, September 8, 2008

Say It With Letters - FALL

It certainly is starting to feel like fall around here! To celebrate, I was lucky enough to alter this beautiful set of FALL letters from Damboise Designs and Say It With Letters. This Smerkin font is brand new and wide enough to hold all the paper and goodies you want to show off. I added sunflowers, wheat, fall leaves, acorns, twine and ribbon to mine. Each letter is predrilled with a keyhole hanger if you want to use the set on the wall. I used mine on my fireplace mantle propped against a few small votive candle jars. Detail photos for this project can be seen here.

Special thanks to Deb Damboise at Say It With Letters for this guest designing opportunity. I have a set of her Halloween shapes and letters in the works...stay tuned!

ETA: My FALL letters design is now available as a kit. Click ♥ here ♥ to get yours!